When you start thinking about how to childproof your home, you have to get a new perspective—literally, your child's. It's really all about getting ahead of potential accidents by securing heavy furniture, locking away chemicals, covering outlets, and gating off dangerous areas like stairs. Doing this right turns your home into a safe haven where your little one’s curiosity can run wild without constant danger.
Why Childproofing Is More Than Just Outlet Covers
So many people think childproofing is just a weekend project of plugging outlets and slapping some locks on the lower kitchen cabinets. While that’s a start, real home safety goes a lot deeper. It's a total shift in mindset from reacting to accidents to preventing them in the first place.
The goal isn't just to block access to obvious dangers. It’s to create a space where your child can explore and learn without you having a heart attack every five minutes. This means you have to anticipate what a newly crawling baby or a wobbly toddler will find fascinating—which, from my experience, is almost always the one thing you overlooked.
The tough reality is that there's a huge gap between what we think is dangerous and where kids actually get hurt. A 2023 report was a real eye-opener, showing that 55 percent of injuries to children under five were preventable if better safety measures had been in place. Here's a shocker: while 95% of parents think bedrooms are safe, almost 200,000 kids under five are injured by beds and bedding every year in the U.S. alone. Statistics like these really drive home why a thorough, room-by-room approach is non-negotiable.
Adopting a Proactive Safety Mindset
The single best piece of advice I can give you is this: get on your hands and knees and crawl around your house. Seriously. See the world from their height. You’ll suddenly notice dangling cords you never saw before, wobbly furniture that looks like a climbing gym, and tiny choking hazards hiding in plain sight.
It’s not about turning your home into a sterile, bubble-wrapped box. It’s about making smart, strategic changes that make a huge difference.
The ultimate goal of childproofing isn't to eliminate all risks—it's to remove the unseen and unnecessary dangers, allowing your child the freedom to explore and learn without facing serious harm.
Prioritizing High-Risk Areas First
Feeling overwhelmed? Take a deep breath. You don't have to do it all at once. The key is to start with the areas where the most serious accidents tend to happen. Having a plan makes the whole process feel manageable instead of monumental.
To help you hit the ground running, I've put together a quick table outlining the absolute must-do tasks in the highest-risk zones of your home.
Quick-Look Childproofing Priorities
This table is your cheat sheet for tackling the most critical hazards first. Focus on these areas to make the biggest impact on your home's safety right away.
| Area | Top Hazard | Primary Action |
|---|---|---|
| Kitchens & Bathrooms | Poisoning & Burns | Lock all cabinets with chemicals; set water heater to 120°F (49°C) |
| Living & Family Rooms | Furniture Tip-Overs | Anchor all heavy furniture (TVs, bookcases, dressers) to the wall |
| Stairs & Hallways | Falls | Install hardware-mounted safety gates at the top and bottom of all stairs |
By tackling these big-ticket items first, you'll immediately create a safer environment and gain some much-needed peace of mind. Every small fix you make adds another layer to your family's safety net.
Securing Your Living Room and High-Traffic Areas
The living room is usually where all the action happens. It’s the heart of the home, a place for family to relax and spend time together. But once you have a newly mobile baby, it suddenly looks like an obstacle course full of tempting—and dangerous—items. Learning how to childproof your home starts right here, in one of the busiest spots in the house.
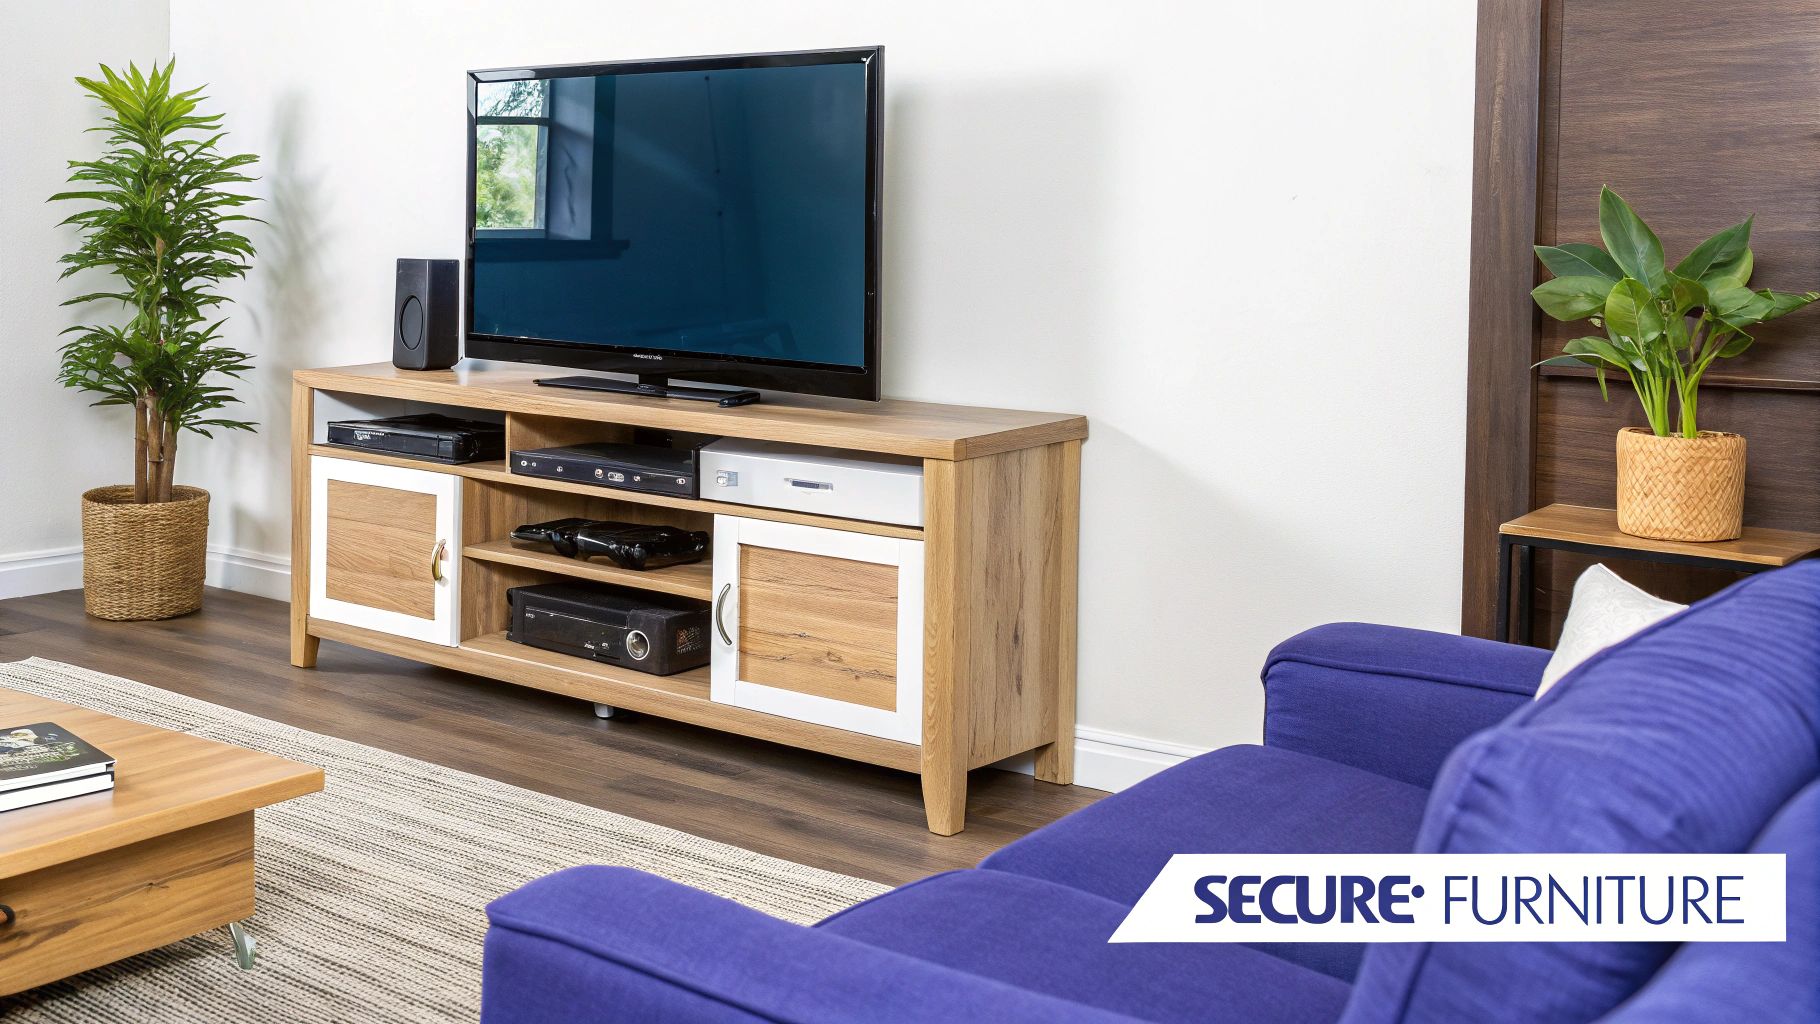
Your absolute first priority should be addressing tip-over risks. That heavy bookcase or sleek flat-screen TV might look perfectly stable to you, but to a wobbly toddler learning to pull themselves up, it’s the ideal handhold. A determined little one can bring heavy furniture crashing down in a matter of seconds. This isn't just a suggestion; it's a critical safety step.
Every single tall or heavy piece of furniture needs to be anchored to the wall. I'm talking about bookcases, dressers, TV stands, and even the television itself. You can find inexpensive anti-tip kits that include all the hardware you need. It’s a quick job that prevents a truly devastating accident.
Taming the Entertainment Center
Entertainment centers are like a magnet for curious crawlers. They’re often home to a tangled mess of electrical cords, which create both strangulation and shock hazards.
Start by getting those cords organized and hidden. Use cord organizers or sleeves to bundle them up neatly, then secure them completely out of reach behind the furniture. For any outlets you need to keep using, a box-style outlet cover is a lifesaver. It encloses the entire plug and cord, making it impossible for tiny fingers to get in there.
Don’t forget about the gadgets themselves. All those blinking lights and irresistible buttons on DVD players, gaming consoles, and cable boxes are just begging to be pushed. If you can, put these devices inside a cabinet and secure it with a childproof lock. Magnetic locks are fantastic for this because they're completely invisible from the outside, so you don't have to sacrifice your furniture's look.
Softening the Sharp Edges
Those sharp corners on coffee tables, media consoles, and fireplace hearths are at the perfect height to cause a nasty head injury to a toddler who's still a bit unsteady. It’s honestly one of the most common reasons for bumps, bruises, and even stitches.
You've got a few solid options for dealing with this:
- Corner Guards: These are small, cushioned pieces that stick right onto sharp corners. You can find them in clear plastic that blends in or in soft, colored foam.
- Edge Bumpers: For longer surfaces, like the edge of a fireplace hearth, you can use a long strip of foam bumper material that you cut to the exact length you need.
- Temporary Removal: Some parents just decide to store their sharp-edged coffee table for a while. They'll swap it out for a soft ottoman until their child is steadier on their feet.
A friend of mine learned this the hard way when her son took a tumble and ended up with stitches from the corner of their brand-new oak coffee table. After that, they invested in a large, round, upholstered ottoman, which served as a footrest, extra seating, and a safe play surface.
Safeguarding Hallways and Stairs
Hallways and staircases are the main thoroughfares in your home, and keeping them safe is non-negotiable. If you have area rugs in hallways, make sure you use a non-slip rug pad under every single one to prevent slips.
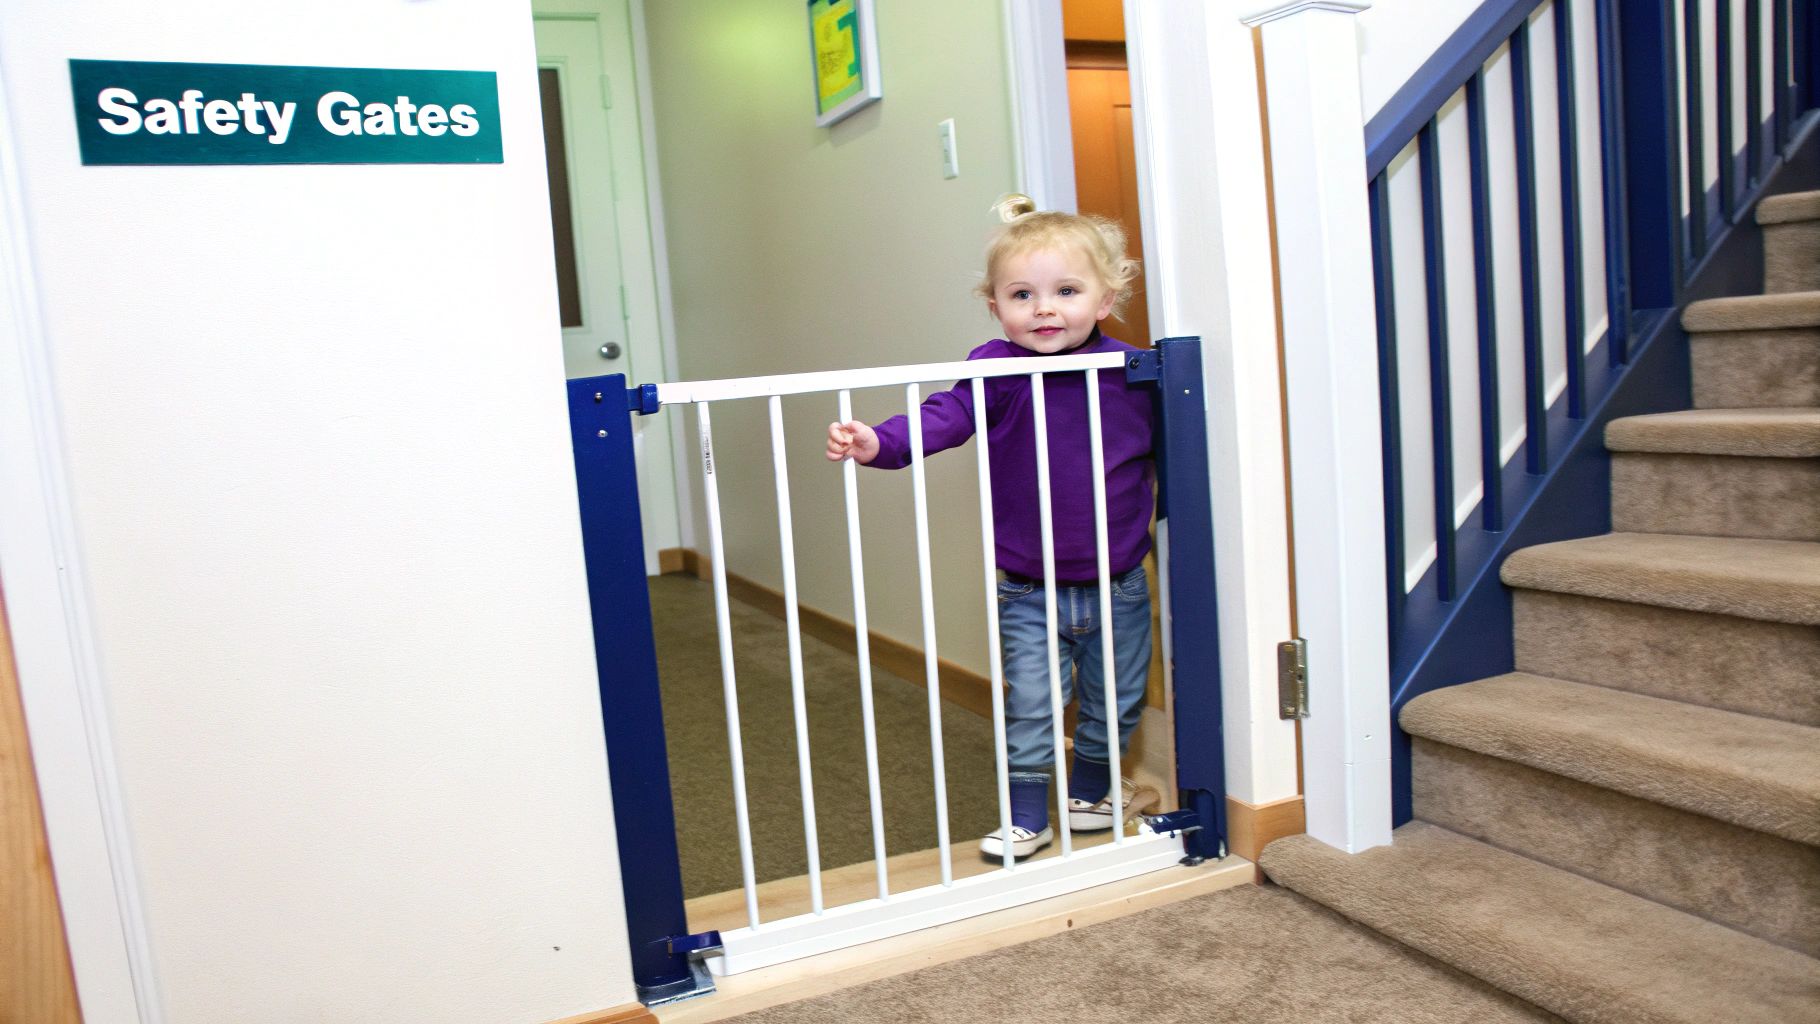
When it comes to stairs, choosing the right safety gate is one of the most important childproofing decisions you’ll make. There's a huge difference between the two main types, and it's crucial you know which one to use where.
| Gate Type | Best Use Case | Installation |
|---|---|---|
| Hardware-Mounted | Top of stairs, bottom of stairs | Screws directly into the wall or banister. Extremely secure. |
| Pressure-Mounted | Between rooms, in hallways | Uses pressure to hold it in place. Not safe for stairs. |
You should never, ever use a pressure-mounted gate at the top of a staircase. A determined child could push it over, leading to a serious fall. Always install a hardware-mounted gate there. It takes a little more effort to set up, but the peace of mind it offers is absolutely essential for knowing you've done everything you can to childproof your home.
Tackling Kitchen and Bathroom Danger Zones
From personal experience, I can tell you that kitchens and bathrooms are the two rooms that give parents the most anxiety—and for good reason. They are jam-packed with hazards. Water, heat, chemicals, sharp objects... it’s all concentrated in these small, high-traffic spaces.
It only takes a split second for a curious toddler to get into serious trouble. Your approach here needs to be methodical. You're not just locking things down; you're also thinking one step ahead about the hidden risks. Let's walk through how to secure these areas, starting with the kitchen.
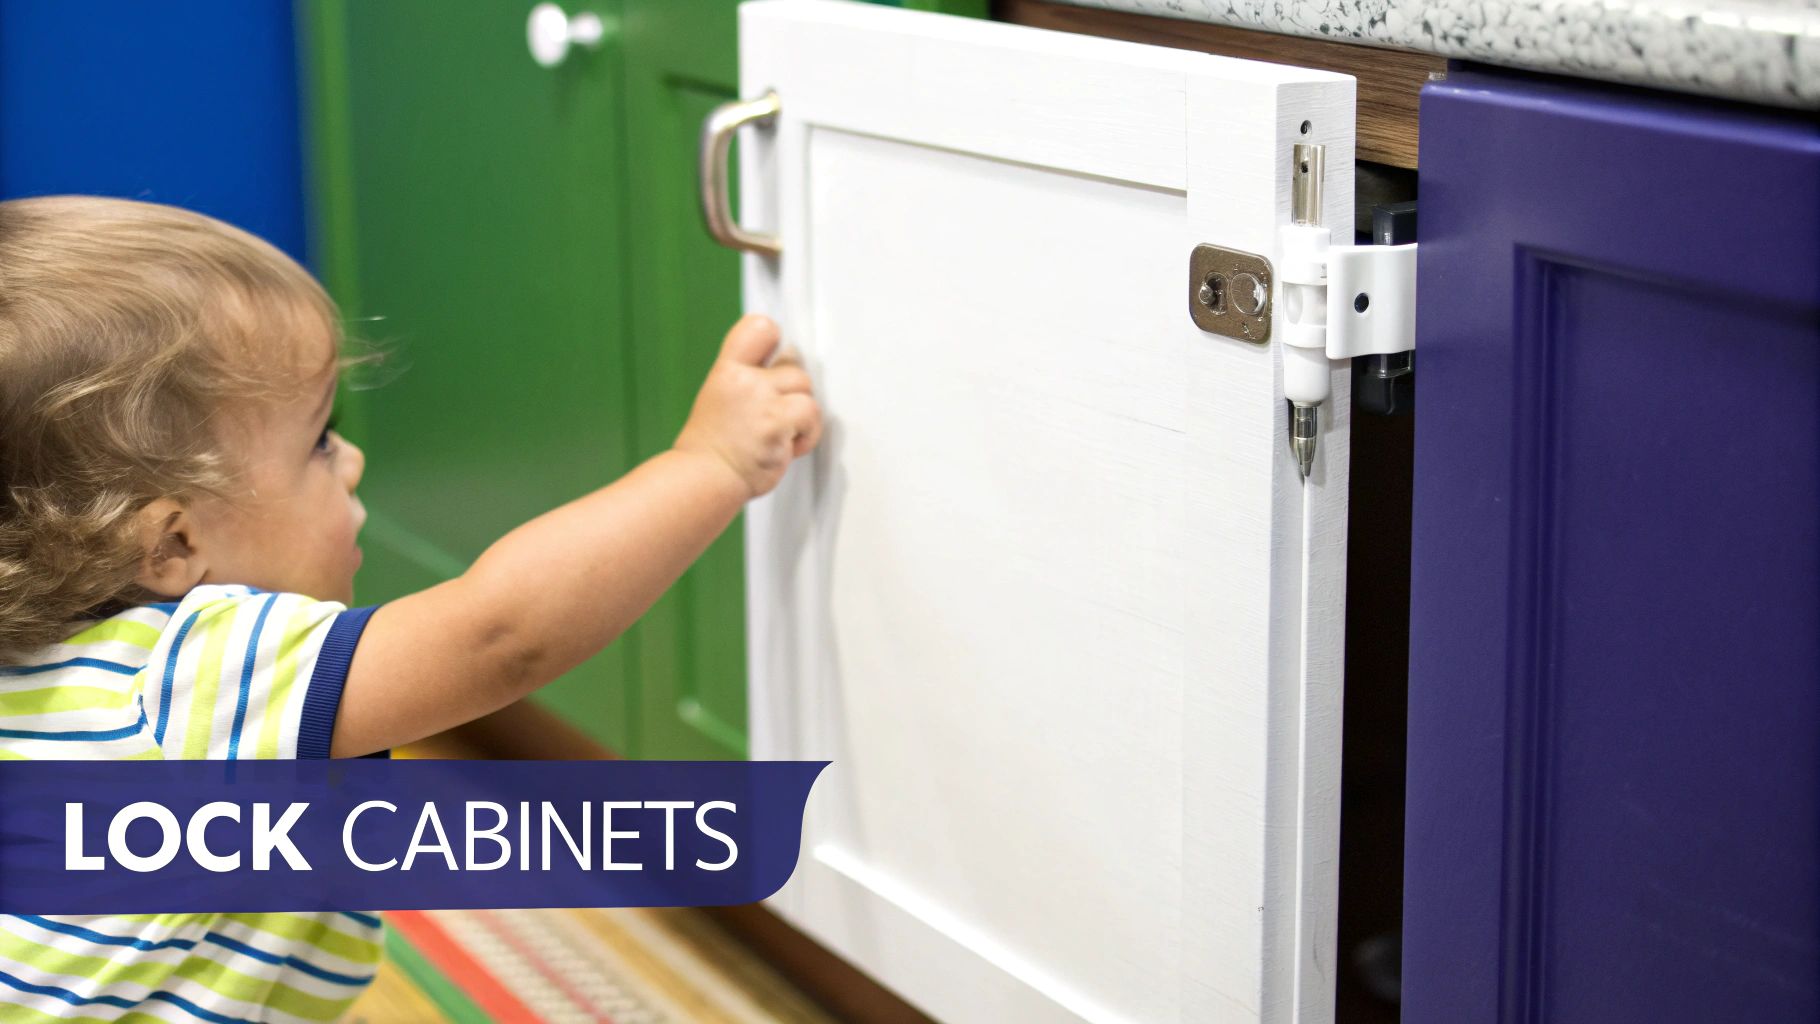
Securing Kitchen Cabinets And Drawers
To a toddler, your kitchen cabinets and drawers are basically treasure chests. What's inside? Under the sink, you probably have cleaning supplies, dishwasher pods, and soaps—all incredibly dangerous if ingested. And your drawers hold knives, forks, and other things that are definitely not toys. Locking these up isn't optional; it's a must.
There are a few different types of locks out there, and each has its own place.
- Magnetic Locks: These are my go-to for a clean, seamless look. They install on the inside of the cabinet, making them completely invisible. You just tap a magnetic "key" on the outside to open them. Super effective at keeping kids out.
- Adhesive Strap Locks: These are incredibly versatile and a breeze to install since there's no drilling. You can use them on cabinets, drawers, the fridge, and even the toilet. The only downside is that a really determined toddler might eventually weaken the adhesive.
- Spring-Action Latches: This is the classic, affordable choice. You have to push down on a small spring latch to open the door, which is surprisingly tricky for little fingers. They require a bit of drilling but are a very reliable solution.
Deciding which lock is right for your home can feel overwhelming. To help, we put together a guide that breaks down all the options. You can check out our deep dive comparing the best baby proofing systems for cabinets and drawers to find the perfect fit for your family.
Managing Kitchen Appliance And Heat Risks
The kitchen dangers don't stop at the cabinets. Ovens, stoves, and small appliances are major concerns. Those stove knobs are just begging to be turned by little hands, which is why stove knob covers are essential. These simple plastic shields pop right over your existing knobs and stop a child from accidentally turning on a burner. An appliance lock for the oven door is also a smart move to prevent them from opening it when it's hot.
Don't forget about the small appliances on your countertops, like toasters, blenders, and coffee makers. Keep them unplugged and pushed as far back as you can. A dangling cord is a huge temptation for a toddler to pull, and that can bring a heavy appliance crashing down.
A simple habit that can prevent a true disaster: always turn pot and pan handles toward the back of the stove. A handle sticking out is an easy grab for a curious child, and it can lead to devastating burns in an instant. This one change costs nothing but is priceless for safety.
Creating A Safer Bathroom Environment
The bathroom introduces its own unique set of hazards, mostly centered on water, slips, and access to medications. The combination of water and slick tile makes falls a very real risk. A good non-slip mat inside the tub and another on the floor next to it are non-negotiable.
Water temperature is another big one. A toddler's skin is much thinner than ours, making them extremely vulnerable to hot water burns. One of the most important childproofing steps you can take is to set your water heater's maximum temperature to 120°F (49°C). It's a simple adjustment that dramatically reduces the risk of scalding.
Finally, just like in the kitchen, lock everything up. The toilet lid needs a toilet lock to prevent drowning risks and some seriously messy playtime. Most importantly, all medications, vitamins, and cleaning supplies must be in a high, locked cabinet. A standard medicine cabinet with a simple magnet closure just won't cut it—you need a real, physical childproof lock to be truly safe.
Creating a Truly Safe Sleep Space
 A child’s bedroom should be their ultimate sanctuary, a place for restful sleep and peaceful dreams. But as you quickly learn on this parenting journey, a space that seems perfectly safe one day can be full of hazards the next—especially as your baby grows into a curious, mobile toddler.
Creating a safe sleep space isn't just about picking out a cute crib. It's a room-wide mission that involves carefully looking at everything from the crib itself to the furniture, windows, and electronics.
The Foundation of Safe Sleep
The absolute cornerstone of a safe nursery is the crib. For infants, the "bare is best" rule is non-negotiable. It's one of the most critical safety measures you can take.
This means the crib should have only a firm mattress that fits snugly against all four sides, with no gaps where a baby could get trapped. Cover it with a tight-fitting sheet, and that's it. Nothing else belongs in there.
- No Crib Bumpers: I know they look cute and are sold everywhere, but bumpers are a known suffocation risk. Just don't use them.
- No Blankets or Pillows: These can also lead to suffocation. A sleep sack or wearable blanket is the perfect way to keep your baby warm and safe.
- No Stuffed Animals or Toys: Keep the sleep space completely clear to reduce all risks.
These guidelines are your best defense against Sudden Infant Death Syndrome (SIDS) and other sleep-related dangers. A clear crib is a safe crib.
Securing The Room For Mobile Toddlers
Once your baby starts pulling up, crawling, and eventually walking, the game changes. The entire bedroom becomes their playground, and this is when anchoring furniture becomes a life-or-death necessity. It's terrifying to imagine, but a child can easily use an open dresser drawer as a ladder, causing the whole piece to tip over on them.
This is why every single piece of heavy or tall furniture—dressers, changing tables, bookcases, toy chests—must be securely anchored to the wall. You can get anti-tip kits for a few dollars, and they're simple to install. It's a small task that prevents a huge tragedy.
A sobering fact is that a child dies, on average, every two weeks from furniture or a TV tipping over. Almost all of these tragedies are preventable with simple wall anchors. It's the single most important childproofing task in a bedroom.
Addressing Window and Electrical Dangers
Windows are another major hazard zone in a child’s room. The cords on traditional blinds are a significant strangulation risk. A child can get tangled in a looped cord in just a few seconds.
The safest fix is to replace all corded blinds with cordless versions. If that's not in the budget right now, you must secure the cords completely out of reach using cord cleats or wind-ups. Make sure you also move all furniture, including the crib, far away from windows so your child can't climb up and get to them. For rooms on upper floors, window guards or stoppers that prevent windows from opening more than four inches are a very smart addition.
Finally, let's talk electronics. Baby monitors and sound machines are nursery staples, but their cords pose the same strangulation risk as blind cords. Keep these devices far from the crib and use cord covers to secure any loose wire tightly against the wall.
For electrical outlets, you need to go beyond the simple plug-in caps, which can become a choking hazard themselves. Instead, opt for sliding outlet covers or box-style protectors. These are much, much harder for a determined toddler to defeat.
By systematically going through these four areas—the crib, the furniture, the windows, and the electronics—you can truly create a peaceful and safe environment for your child to sleep and grow.
Tackling the Garage, Laundry Room, and Yard
While we spend most of our time in the living room and kitchen, it’s often the spaces we use least that hide some of the biggest dangers. I'm talking about the garage, the laundry room, and the yard—areas packed with chemicals, tools, and other hazards that demand their own childproofing plan.
The garage is a place most parents rightly identify as a high-risk zone. In fact, nearly two-thirds of parents see it as a dangerous spot for kids. With unintentional injuries being the leading cause of death for toddlers worldwide, it’s no wonder. The first order of business is locking away things like pesticides, antifreeze, and paints.
Securing The Garage And Laundry Room
In the garage, your absolute top priority is getting all chemicals and tools completely out of your child's reach. And I don't just mean putting them on a high shelf. A determined toddler can and will use shelving as a makeshift ladder. Everything hazardous needs to go inside a locked cabinet or closet.
While you're there, take a minute to test your automatic garage door's safety sensors. Just place a roll of paper towels on the ground right where the door closes. When you hit the button, the door should touch the roll and immediately reverse. If it doesn't, that sensor needs to be looked at by a professional, pronto.
The laundry room presents its own unique set of challenges.
- Detergent Pods: These colorful little packets look like candy but are extremely dangerous if ingested. Always keep them in their original container, stored on a very high shelf or, even better, in a locked cabinet.
- Washer and Dryer Doors: A front-loading machine can look like a fantastic hiding spot to a curious child. An appliance lock is a simple fix to keep those doors securely shut when you're not doing laundry.
- Cleaning Supplies: Just like in the garage, all your bleach, stain removers, and other powerful cleaners need to be locked up tight.
A simple rule of thumb for these utility areas is a game-changer: if it's not safe for your child to eat, drink, or play with, it must live behind a locked door. Adopting this mindset is the key to truly effective childproofing.
This next image really drives home how crucial thorough childproofing is.

As you can see, there's a big difference between common half-measures and the comprehensive approach needed to prevent thousands of injuries every single year. It really underscores the need to go beyond the basics.
Making Your Outdoor Spaces Safe
Childproofing doesn't stop at the back door. Your yard should be a haven for exploration, not a field of hidden dangers. Start by taking a walk around the entire perimeter of your property.
Make sure any gates leading to the street or an alley have self-closing and self-latching mechanisms. The latch itself needs to be high enough that a toddler can't reach it, even on their tiptoes. Give your fence a once-over, too, checking for any gaps or loose boards where a little one could potentially slip through.
If you have a pool, the safety stakes are even higher. Your checklist must include:
- A four-sided fence that’s at least four feet high. It needs to completely isolate the pool from both the house and the rest of the yard.
- A self-closing, self-latching gate on that fence.
- A pool alarm is also a great idea; it will sound an alert if the water's surface is disturbed.
Finally, take a look at your garden. Many common landscaping plants—like oleander, foxglove, and certain types of lilies—are actually toxic if eaten. It's worth the time to identify any poisonous plants in your yard and remove them from areas where your child plays.
Your Childproofing Strategy Has to Grow Up, Too
If you think childproofing is a one-and-done project you can tick off your to-do list, I’ve got some news for you. It’s a living, breathing process that has to evolve right alongside your child as they hit each new, exciting milestone. The safety measures that were perfect for your stationary newborn become almost useless the second they start to roll, crawl, and explore their world.
The real secret to childproofing is learning to think one step ahead of your little one's next move. It’s a constant game of anticipation. For example, that simple adhesive strap lock that kept your curious crawler out of the snack pantry? It stands no chance against the problem-solving skills and surprising brute force of a determined two-year-old.
From Crawler To Climber
As your child develops new physical and mental skills, they inadvertently introduce brand-new risks into your home. The moment a baby masters their pincer grasp, every tiny object on the floor becomes a potential choking hazard. When an infant starts pulling up to stand, every low table, chair, and piece of furniture suddenly becomes a tipping danger.
Your childproofing game needs to level up as they do.
- Crawling Stage (6-10 months): Suddenly, their entire world is at floor level. Your focus needs to pivot to outlet covers, securing low cabinets, and clearing any and all hazards from the floor.
- Walking Stage (10-18 months): Toddlers are adorably wobbly and prone to tumbles. This is prime time for corner guards on sharp furniture edges, non-slip pads under rugs, and sturdy gates at the top and bottom of stairs.
- Climbing Stage (18+ months): To a toddler, everything is a ladder. Anchoring furniture and TVs is no longer just a good idea—it's absolutely critical. You’ll also need to take another look at your windows and how they're secured.
Staying vigilant is everything because the landscape of risk in your home is constantly shifting. In the United States alone, over 3.4 million children suffer unintentional injuries at home every year. This staggering number, reported by Safe Kids Worldwide, really highlights the need for a proactive and adaptive approach to safety.
The Audit and Educate Routine
Every few months, make it a point to get down on your hands and knees. See your home from their perspective. It’s amazing what you’ll notice. While you're down there, check that all your safety devices are still installed correctly and working properly. A gate latch can loosen with daily use, and even the best adhesives can weaken over time.
This is also the perfect time to start weaving in age-appropriate safety rules. Simple, firm words like "hot" near the stove or "gentle" with the family dog begin to build a crucial foundation of understanding. For a deeper dive into these core ideas, check out our guide on the 5 things to know about baby proofing.
It's this combination of physical barriers and ongoing education that creates a truly safe and secure environment for them to thrive in.
Common Childproofing Questions Answered
Even after you’ve tackled every room on your checklist, it's completely normal to have a few lingering questions pop up. Childproofing your home is a huge undertaking, and a lot of specific concerns only come to mind once you’re in the thick of it.
Let's dive into some of the most common questions we hear from parents, so you can move forward with total confidence.
When Should I Start Childproofing?
Honestly, the sooner the better. The sweet spot is usually during the second trimester, well before your baby even thinks about becoming mobile. This gives you plenty of breathing room to research, buy what you need, and get everything installed without the frantic pressure of a newly crawling infant.
If you can, try to have all the major safety measures in place by the time your baby is four to six months old. You’d be surprised how quickly they can go from stationary to speedy!
A recent report drove this point home, finding that 1 in 8 parents said their child needed medical attention for a home injury in a single year, usually from falls. It’s a sobering reminder to be proactive. You can see the full details in this Safe Kids Worldwide report.
Can I Childproof on a Tight Budget?
Absolutely. You don't need to splurge on the most expensive gadgets to make your home a safe haven for your little one. The key is to start with the biggest risks and lean into simple, no-cost solutions first.
Pro Tip: Some of the best safety hacks are completely free. Moving all your cleaning supplies and chemicals to a high, unreachable shelf or just being diligent about keeping the bathroom and laundry room doors shut can prevent a ton of common accidents.
When you do spend money, prioritize the non-negotiables: hardware-mounted gates for stairs and solid furniture anchors are worth every penny. For many other areas, a bit of creativity works just as well as a pricey product.
Is Professional Childproofing Worth The Cost?
For a lot of families, hiring a professional childproofer is a fantastic investment. These experts have a trained eye for hazards you might completely miss. They know exactly which products work best for tricky situations (like funky, non-standard banisters) and ensure everything is installed perfectly for maximum safety.
It's an especially smart move if you're short on time, not super confident in your DIY abilities, or just want that extra peace of mind that comes from a pro's seal of approval.
While we're on the topic of overall home safety, another thing parents often ask about is creating a healthy environment. This can include using eco-friendly pest control treatments to keep your child's exposure to harsh chemicals at a minimum, especially in the rooms where they spend the most time playing and sleeping.
At Benny Bradley's, we're all about designing products that make home safety simple and stress-free for parents. From our invisible magnetic cabinet locks that keep curious hands out of trouble to our helpful guides, we’re here to support you every step of the way. Explore our full range of childproofing solutions at https://bennybradleys.com.
Leave a comment